Most users usually face common problems like unwanted blank page or page break that is difficult to remove while creating content on Microsoft Word. Problems like this can be very frustrating if the user has no idea on how to deal with them. Though many people end up printing only selected pages when they face such problems but doing that doesn’t in any way solve the problem, hence, the essence of this article. If you are searching for how to delete a blank page or page break in MS Word, you are on the right page, as we have the solution right here with us. Keep reading!
How to Delete a Blank Page
Usually, extra blank pages in Microsoft Word come up as a result of extra page breaks or paragraphs. Nevertheless, deleting a blank page on the software is not a difficult task. Most people usually solve this problem by clicking on the bottom-right corner of a blank page and striking backspace until it goes but if you’ve tried and failed, you can as well resolve this problem by opening and then deleting all of the hidden format markers.
You can delete a blank page on MS Word using the following method:
1. Open the document in Word
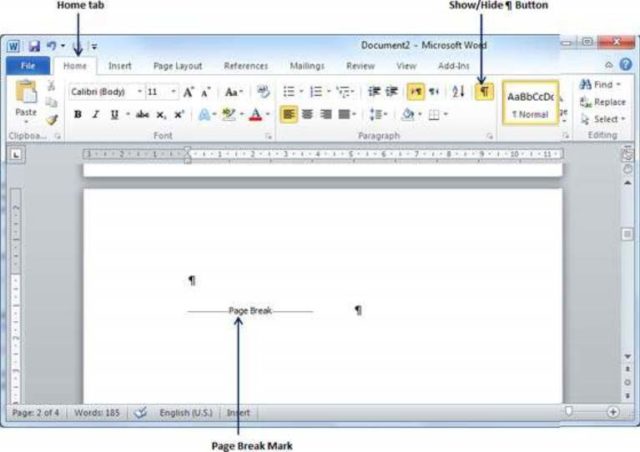
2. Press ⌘ Cmd+8 (Mac) or Ctrl + shift + 8 (Windows). Once you do this, you will find the paragraph markers (¶) at the end of existing paragraphs and at the beginning of each blank line. In fact, sometimes, you may see lines that also say “Page Break”.
3. Move to the blank page and if you come across a line that says ‘Page Break’ or a ¶, just go ahead and delete it.
4. Anywhere you see Page Break or the ¶ mark or more than one of each, highlight them at once with your mouse.
5. The next thing is to strike the Delete Key. Once this is done, it should delete all the page breaks and ¶ marks. You can also strike the Delete key more than once to delete the entire page.
6. You can now make those markers invisible again by turning off the paragraph marks. You can achieve this by using one of these keyboard shortcuts: ⌘ Cmd+8 (Mac) or Ctrl+⇧ Shift+8 (Windows) or clicking the ¶ icon.
Method Two: Removing a Blank Page at the End of a Table
1. Open the document in Word.
2. Go to the Table Tools tab: To find this, go to the top of the screen but if you didn’t find it there, click somewhere in the text, which is located just above the blank page and it should appear.
3. Go to the Table Tool tab and click “Layout”. Once this is done, the table settings will automatically appear in the top bar.
4. Click on “View Gridlines” to see visible lines hanging around the text that comes just before the unwanted blank page.
5. The next step is to enable paragraph marks. Once this is done, this will make several paragraph symbols (¶) to come up on your page. The easiest way to do this is by pressing Ctrl + Shift + 8 (for Windows) and ⌘ Cmd+8 (Mac).
6. Select the paragraph symbol (¶ ) beneath the table. However, if you come across more than one ¶, simply use your mouse to select all of them.
7. Click your way to the Home tab. You will see that the paragraph marker is selected. Now, you can change its font size.
8. Click once inside the font size box.
9. Press 1 and then Enter to reduce the size of the hidden paragraph so as to stop it from setting up its own entire blank page. Once you do this, the blank page will disappear immediately.
10. You can now turn off the paragraph marks so as to make those markers invisible again. You can use one of these keyboard shortcuts – ⌘ Cmd+8 (Mac) or Ctrl+ Shift+8 (Windows) or simply click the ¶ icon.
How to Delete Second Page or Page Break in Word
A page break, also known as a hard page break, is one of the elements that promote pagination. In a simple term, it is a marker in an electronic document that informs the document interpreter that the content which comes behind is part of a new page. Once a Page Break is inserted into a document, a symbol showing the “Page Break” comes up immediately while the cursor moves over to the next page.

Microsoft Word has two types of page breaks. The first one is the break that Word adds automatically to indicate the end of each page while the second one is the break users add manually. While you can delete manual page breaks you added, you are not allowed to delete automatic page breaks created by Word, but you can adjust where they are found. An automatic page break is indicated by a dotted line and a manual page break is a dotted line that reads “Page Break”.
Here are steps on how to remove a manual page break:
1. Go to the Home tab and click on the Show/Hide symbol, which usually appears as a paragraph mark (¶). This will show you hidden non-printing characters like page breaks and spaces.
2. Click on the break you want to delete twice.
3. Strike Delete.
To Adjust (Keep Together) Automatic Page Break:
1. Highlight the lines or paragraphs you want to keep together.
2. Go to the Layout tab and open the paragraph settings under it. You can achieve this by clicking on the expanded options icon.
3. Go to the Line and Page Breaks tab and choose one or more of the following options, which will basically help you control the flow and formatting of your document.
a. Page break before: The function of this one is to add a page break before your selected paragraph.
b. Keep with next: This one ensures that no breaks occur between your selected paragraphs
c. Window/Orphan control: If you want to see at least two lines of a paragraph at the bottom or top of your page, then you need to select the window/orphan control.
d. Keep lines together: The function of this one is to prevent a page break in the middle of a paragraph.
See Also: Garmin Connect Login, Download, Mobile App, How To Fix Syncing Errors
Bonus: How To Insert a Manual Page Break
Simply follow these steps and you will get it done in a few seconds.
1. Indicate where you want to insert a page break by clicking on the area.
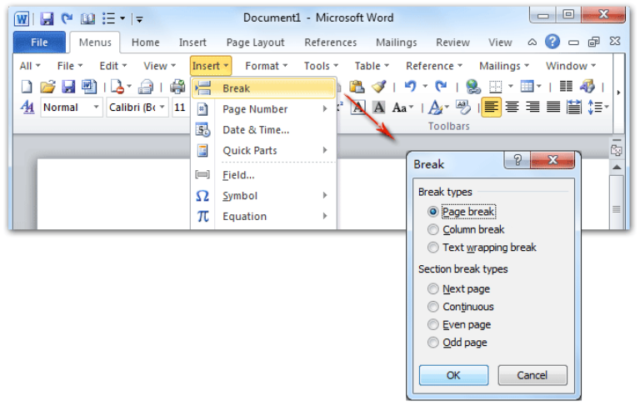
2. Go to the Insert menu and click Page Break.

